
Description
I purchased this truck directly from the US Government in a sealed-bid auction through the Defense Reutilization and Marketing Service (DRMS) [note that civilians can no longer do this; we now need to go through a company called Government Liquidation]. I bid on this truck (and one other similar truck, which I did not get) in an auction held on September 9, 1999, received notice that I was awarded the truck on September 27, 1999, and towed the truck home the following day. The truck was located in the Yermo Marine Corps Logistics Base (just east of Barstow, CA), and I had it towed about 120 miles to its current home in Chino, CA. The picture above was taken on inspection day in the scrap yard in Yermo. All of the windows, mirrors, lights and reflectors were covered with duct tape for shipment at the time.
This truck is a member of the M44-series family of trucks. These trucks were made in many configurations, including the common M35 cargo trucks, dump trucks, water and fuel tankers, specialized versions for installing telephone poles, etc. My shop van was intended for use as a mobile repair shop. There’s no telling how mine was used, but possibilities include a mobile electronics workshop, a mobile arms repair shop, etc.
These trucks have 5-speed manual transmissions with 2-range transfer cases. The earliest ones had gasoline engines, but most of them were made with multifuel diesel engines (hence one of their common nicknames, “multifuels”). The basic cargo version can carry 2.5 tons of cargo off-road (hence another common nickname, “deuce and a half”), or 5 tons on the highway, and can also tow an additional 3-5 tons (some configurations, such as my shop van, have lower cargo limits due to their additional body hardware and runing gear). They have 6-wheel drive (generally with dual wheels on the rear pair of axles). Early versions engaged or disengaged the front axle automatically, and the later “air-shift” trucks (like mine) let the driver engage or disengage the front axle with a switch on the dashboard. With dual wheels on the rear axles, there are a total of 10 wheels on the ground, all of them driven, giving this truck great traction off-road. These trucks have a top speed of 58 MPH on the highway, limited by a governor in the fuel injection pump.
At the time I bought my truck, it had only 3076.1 miles on the odometer, and 1.1 hours on the engine runtime meter. Its engine (originally built in 1980) has a 1989 rebuild tag, and probably is not original to the truck. It looks to me like the military replaced the engine with a rebuilt one for some unknown reason (maybe to add the “clean air” turbocharger?), and then drove the truck no more than 60 miles before sticking it in the scrap yard!
Unit Markings
Here are the markings I found on my truck. I haven’t researched what they mean yet…
- Right side of hood, and above van doors: US ARMY NK03QM
[painted over, but readable because stick-on letters were used, and paint cracked at edges of letters] - Both engine compartment side doors, both sides of van near rear: 7188
- Rear of van, right side, and right side of front bumper: W038
[painted over with black paint]
Specifications
Here are the specifications for my truck. Note that these trucks were made by many manufacturers, in many revisions and configuration, so similar trucks (even other M109A3 vans) may have different specifications.
General Specifications
| Name | M109A3 2.5-Ton 6×6 Shop Van |
|---|---|
| Manufacturer | AM General |
| Year | 1972 |
| Cargo capacity | Cross-country: 5,000 lbs Highway: 7,500 lbs |
| Towed load | Cross-country: 6,000 lbs Highway: 10,000 lbs |
| Height | 130 in (10 ft 10 in) |
| Length | 268 in (22 ft 4 in) |
| Width | 98 in (8 ft 2 in) |
| Weight | Empty: 14,930 lbs Gross (cross-country): 19,430 lbs Gross (highway): 21,930 lbs |
| Van deck height | 50 in |
| Rear door opening | Height: 70 1/2 in (5 ft 10 1/2 in) Width (one door open): 31 3/4 in (2 ft 7 3/4 in) Width (both doors open): 51 3/4 in (4 ft 3 3/4 in) |
| Van interior dimensions | Height at center: 77 1/2 in (6 ft 5 1/2 in) Width: 90 in (7 ft 6 in) Length: 144 1/2 in (12 ft 1/2 in) |
| Pintle height | 36 1/8 in |
| Ground clearance | Under axle: 12 1/2 in Under chassis: 10 15/16 in |
| Vehicle/bridge classification | Empty: 7 Cross-country: 9 Highway: 10 |
| Wheel base | 154 in (12 ft 10 in) |
| Approach angle | 47 deg |
| Departure angle | 40 deg |
| Turning radius | 36 ft |
| Cruising range | 300 mi (max payload, @ 1500 RPM) 275 mi (max payload + max towed load, @ 1500 RPM) |
| Fording depth | 30 in |
| Tires | 9.00 x 20, 8 ply. Tire+wheel weighs around 200 lbs. |
| Tire inflation | Highway: 50 psi Cross-country: 35 psi Mud, sand, snow: 15 psi |
| Brakes | Hydraulic, with air boost and glad hands for towing trailers with air brakes |
Engine
| Engine | White LDT-465-1C 6-cylinder multifuel “clean-air” diesel (manufactured 1980, rebuilt 1989) |
|---|---|
| Power | 130 HP at 2600 RPM |
| Torque | 305 pound-feet |
| Displacement | 478 cu. in. (7.8 liters) |
| Engine weight | 1,650 lbs |
| Idle speed | 800-850 RPM |
| Operating speed | 1500-2600 RPM |
| Oil pressure at idle (min) | 10 psi |
| Oil pressure at full power (max) | 75 psi |
| Coolant temperature | 180°F to 200°F |
| Fuel consumption | 5-6 mpg |
Fill Capacities
| Cooling system | 32 quarts |
|---|---|
| Differential | 6 qts (each of 3 diffs) |
| Engine oil (crankcase only) | 20 quarts |
| Engine oil (crankcase and filters) | 22 quarts |
| Fuel | 50 gallons |
Pictures
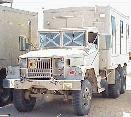 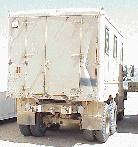 Inspection day in Yermo: Exterior, front and rear views, showing big dent in van body. 8/27/99 |
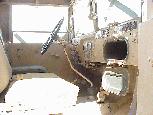 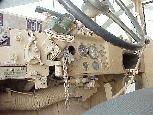 Inspection day in Yermo: Cab, seen from passenger’s and driver’s doors. The passenger seat is actually green under all that dust! Note how the Army helpfully painted right over nameplates, indicator lamps, etc. 8/27/99 |
  Inspection day in Yermo: Van interior. 8/27/99 |
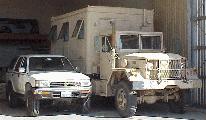 Here’s a picture of my Toyota 4Runner and my M109A3 next to each other, to give you an idea of just how BIG this shop van is! 10/23/99 |
    Curbside power entry connector on front of van body, at upper right corner: This big 60A connector allows you to supply 115VAC to the lights and outlets in the van body. The van body has 6 115VAC lights (5 regular, one blue for blackout conditions), and 2 24VDC lights for use when AC power is not available. The exhaust blower can be operated from 115VAC or 24VDC. Also shown are a few pictures of the correct (and hard to find!) connector for the power cable. 10/2/99, 6/25/00 |
  These scanned catalog pages show the curbside power connector (and other connectors from the same family). Warning: these are big images! 6/25/00 |
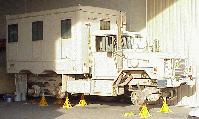 It’s the Flying Deuce! 10/30/99 |
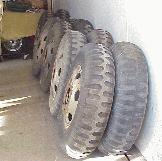 At 212 pounds each, this truck’s wheels alone weigh more than some whole cars! That’s a Ford Mustang in the background. 10/30/99 |
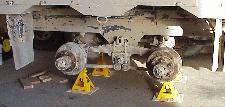 Here’s the rear suspension, on the right side of the truck. The front of the truck is towards the right side of the picture, of course. 10/30/99 |
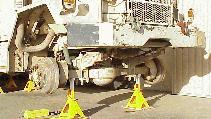 Here’s the front suspension. 10/30/99 |
   This is the forklift-like wheel dolly I built out of 2×6 redwood, 2×4 pine, a 2-ton bottle jack and lots of hardware, to help lift the BIG, HEAVY wheels on and off the hubs. Don’t build one like this… it’s way too flimsy for handling 9×20 wheels, and it barely survived one tire rotation. The parts for this one cost about $100. Commercial wheel dollies cost about $200-$800, can lift around 750-1000 pounds, and are available from companies like Harbor Freight and Grainger. 10/30/99 |
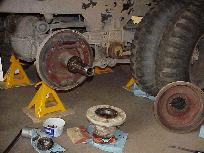 Here’s the left middle wheel hub, disassembled, right before I replaced the wheel studs. 11/6/99 |
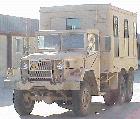 I finally got around to snapping a picture outdoors after removing the duct tape from the windows and lights. 12/11/99 |
 My license plates and title finally arrived! 5/7/00 |
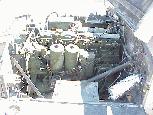 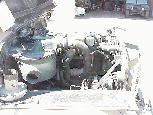 Here’s the engine, seen from the left and right sides. At the front of the truck is the radiator (it’s a bit washed out by the sunlight). The item with the cooling fins behind the radiator is the air compressor. The two large cans behind the air compressor are the engine oil filters, and rectangular box behind the filters is the oil cooler. The two smaller cans (partially obscured by the steering wheel shaft) are the secondary and final fuel filters. The fuel injection pump is visible below the front oil filter, and the six injectors are visible along the left side of the engine. There are two valve covers, with an oil filler in the front one. The metal plate in the foreground of the picture holds the hot-water personnel heater, which I removed to try to fix the bad blower motor. I found a complete NOS heater installation kit, so I’ll just install a new heater, instead. The silver duct is a piece of dryer duct that I used as a temporary repair; I’ll replace it with the proper cloth-covered duct later. The box on top of the engine next to the front valve cover is the intake manifold flame heater, which is used for cold-weather starting. This engine does not have any glow plugs.The right side of the engine is a lot less interesting than the left side. The air filter, turbocharger and alternator are visible. That loop of black hose is temporarily connecting the hot-water heater supply and return valves together; they were a bit crusty, so I connected a hose between them in case they leak. 8/20/00 |
|
 Last day! My truck is on its way to its new owner in Washington. 11/13/04 |
 Last day! My truck is on its way to its new owner in Washington. 11/13/04 |
 Last day! My truck is on its way to its new owner in Washington. 11/13/04 |
 Last day! My truck is on its way to its new owner in Washington. 11/13/04 |
 Last day! My truck is on its way to its new owner in Washington. 11/13/04 |
 Last day! My truck is on its way to its new owner in Washington. 11/13/04 |
 Last day! My truck is on its way to its new owner in Washington. 11/13/04 |
 Last day! My truck is on its way to its new owner in Washington. 11/13/04 |
Timeline
| 8/27/1999 | Inspection day in Yermo. Truck cranks but does not start. |
| 9/9/1999 | Bid opening. |
| 9/27/1999 | Bid award. |
| 9/28/1999 | Towed truck home. |
| 9/29/1999 | Engine starts! Just needed fuel added, and air purged from fuel system. One flat tire, and no pressure in the spare. Oil pressure gauge not working yet. Air seems to work. |
| 10/2/1999 | Oil pressure gauge semi-fixed; still needs a proper mounting bracket, but at least I know the engine is getting oil pressure. Engine runs great. Haven’t driven it yet; need to fix one or more tires first (I found a tire repair shop which claims to service military split ring rims, and will make a house call for a $60 charge). The flat tire is the only thing keeping me from trying to drive it, though I really ought to inspect and adjust the brakes, change the oil in the engine and all gearboxes, and lube the chassis before I do anything with it. There are plenty of little things wrong with it, but most of them are non-critical. Some meathead removed the speedometer cable right-angle adapter at the transfer case, so the odometer may be wrong, but I think the engine truly has been run for only 1.1 hours since its last rebuild. Removed duct tape goo from everything forward of the van body; much more goo remains on van body! |
| 10/16/1999 | Got AC wiring and lighting in van body working by splicing a temporary power cord into the fuse box. I have had no luck finding the proper cord or connector to plug into the curbside AC power plug, but my temporary hack lets me have lighting in the van body until I find one. Circuit breakers didn’t work at first; their connections to the power bus needed to be cleaned, and they needed to have some dust blown out of them. The AC blackout interlock switch is dead, so I just get the blue light in blackout mode. Replaced missing speedometer right-angle adapter. Both windshield wiper arms are dead, in different ways. I think the oil pressure sender needs to be replaced after all; I’ll do that when I do an oil change (after I buy some spare filters). Still waiting for my big jack stands to arrive, so I haven’t worked on fixing the flat tire yet. The other tires don’t seem to be leaking. |
| 10/23/1999 | Replaced oil pressure sender, patched up some of the hacked wiring, and lubed the chassis. Well, most of it… my grease gun couldn’t reach some fittings, and a few places wouldn’t take grease. This truck has a LOT of grease fittings! I just need to fix a flat and inspect the brakes before I try taking it for a spin. |
| 10/30/1999 | Jacked the truck up onto six 6-ton jack stands, and started pulling off wheels in order to inspect the brakes, rotate the tires and fix the flat. The flat tire picked up a drywall screw. Hopefully, I can just have the tire shop patch the tube. The spare looks like it has too much dryrot to be usable; I should probably replace it, too. One inner lug nut just refused to budge. It took about an hour of wiggling the tire, drenching it with Liquid Wrench, and hammering away with the impact wrench to get it off. Some of the lug nuts are in bad shape, and will need to be replaced. I built a forklift-like wheel dolly to help me handle those BIG, HEAVY wheels. It’s pretty flimsy, so I won’t bother posting detailed plans. Look at the pictures to see how to not build one! |
| 10/31/1999 | Rotated the tires. That was a big chore! The center hub on the left side has right-handed studs instead of the correct left-handed studs. That annoys me. Well, one of them is stripped or cross-threaded, so I guess I might as well replace all of the studs with left-handed ones if I need to pull the hub off anyway. My wheel dolly is falling apart, but it still made dismounting and remounting the wheels a lot easier. With my weak back, I couldn’t have done it otherwise. When I built it, I thought that the cheapest commercial hydraulic wheel lift/dolly would cost at least $800, but since then I’ve found that Harbor Freight carries a couple different ones, for $200 and $300 respectively. I may try ordering one of those sometime. They’re catalog-only items, weighing 150-200 pounds, so I bet shipment won’t be cheap. To see them, go to their web page and do a search on “wheel dolly”. |
| 11/6/1999 | IT ROLLS! I took my first drive in it tonight, after a very long day of working on it. I brought the flat tire and spare into a tire shop; they patched the flat while I waited, and will order a replacement tire for the spare. After I got back, I mounted the patched wheel, pulled off the two left middle wheels, pulled the left middle axle and hub, disassembled the hub, replaced the wheel studs, cleaned everything, reassembled the hub, packed the wheel bearings, installed the hub, adjusted the bearings, mounted the two tires again, jacked the truck back off the six jack stands, properly torqued all 60 lug nuts by hand, replaced the fuel purge valve that I broke a few weeks ago, put away my tools, changed clothes, and took the truck for a spin around the airport grounds. Whew! |
| 12/4/1999 | This weekend, I decided to check (and if necessary, replace) the fuel filters (it has three in series). I discovered that my primary fuel filter was misassembled, thus allowing unfiltered fuel to proceed to the secondary filter. I also found that the filter kits I ordered from Memphis Equipment Co. were not the correct kits for my truck! They were close, and would have fit in the filter housings, but due to differences in their construction I do not believe that they would have filtered properly. See my M44-Series Parts Cross-Reference page for more details. I also drained the fuel tank and fixed the seeping fuel drain plug. There’s not much more to be done to my truck, other than some wiring repairs in the van body, replacing the heater control cable, and lots of cosmetic work which I plan to put off for a couple years or so. Now I just need to practice driving it so I can get my class-B commercial driver’s licence (which is required in CA, but not in most other states… grrrr), and finish getting it registered. |
| 12/18/1999 | I took my first drive on real roads today. Matt Tait (a MIL-VEH list member with a class A CDL) dropped by the hangar and supervised as I blocked traffic for few miles. :-) It was a short trip, but a fun one. I think I might get the hang of driving this beast before long! I’m still pretty bad at stick-shift driving (I’ve only driven automatics until now), but I’ve gotten to the point where I can generally move the truck around without stalling it (well, except for when I forget to take off the parking brake… DOH!), and I finally have gotten to the point where I succeed in making more than half of the downshifts I attempt. :-) My difficulty with the truck is about 75% due to the manual transmission, and only about 25% due to getting used to driving a large truck. When we got back, Matt noticed some water spray on the ground. It turns out that one of my coolant hoses sprung a pinhole leak. It shouldn’t be too hard to fix. While I’m at it, I’ll replace all of the coolant hoses except for the two very short ones which would require removing the manifold. I’ll also do an oil change, since I’ll need to remove the oil filters to get at one of the hoses. Hopefully those Wix replacement oil filters I got are better matches to my engine than the fuel filters were… Aside from the coolant leak, the truck seems to be running really well. |
| 3/4/2000 | I’ve ignored the deuce for a while because I’ve been distracted by my HMMWV. I would like to drive my van to the MRCG meetingin May, so I’ve started working on it again. Today, I adjusted the driver side door so it finally closes properly, and adjusted both of the side windows as well as I could. I “washed” it, too… actually, I parked it out in the rain for a half hour, and then drove it a few miles. :-) I’m getting pretty comfortable with shifting, so I don’t think it’ll be long before I’m ready to get my class B CDL. I’d like to do the following things to it before the trip:
Although I haven’t decided how I’ll permanently configure the van body yet, it ought to make a nice camper with little effort if I just throw a twin bed, a small fridge, a nightstand, and a small electric space heater in the back, and strap them all in place with some tiedowns and bungee cords while moving. |
| 3/11/2000 | Today, I finally took care of my truck’s VIN inspection. The weight certificate is the only thing standing in the way of finishing my truck’s registration. Matt Tait and I drove my truck about 30 miles round-trip to some truck scales, but didn’t drive away with a proper certified weight ticket. It was this whole big fiasco, and I just don’t want to get into it now. :-) |
| 3/18/2000 | Today, I finally got the truck weighed so I can finish registration. Matt Tait came along for the ride, to teach me more about driving the beast and to make my license valid. I need to have somebody with a valid CDL in the truck with me for my class B CDL training permit to be valid, and Matt has a class A. I got the truck weighed in Tustin, just down the road from where I work. It was a round trip of about 70 miles, mostly on freeways and toll roads, including some long 6% grades. I could have gone to some scales about 15 miles away, but I thought the longer drive through the mountains would be good experience and a lot of fun. Matt had all sorts of good advice, and I think I’m getting the hang of driving my deuce. There were a couple minor snags: My parking brake seems to be dragging sometimes, and was acting a bit funny, and my transfer case blew some oil out the rear seal. It may be a plugged vent, or it may be a bad seal, but it wasn’t leaking badly enough to abort the mission. My truck managed to hold about 35 MPH in fourth gear on the 6% uphill parts. The weight was 15,340, with no passengers and a full tank of fuel. While we were in Tustin, I decided to stop by work to rest for a bit before the trip back. Once of my friends from work was there, and served as an official witness that the truck is real. :-)I’m happy with the way my truck is running. There have been a few problems since I finished my initial repairs, such as the problems I had today and the radiator hose I had a while back, but so far none of them have kept me from getting the truck home. These sorts of things are to be expected when shaking down a 28-year-old truck! |
| 5/7/2000 | I finally got my license plates! See the picture. |
| 11/13/2004 | I’ve sold this truck to a collector up in Washington. I hope that he enjoys it as much as I have! |
I have a 24 volt multi fuel Heater for the M109 A2 or the M291A2/M820/M934 which I wish to sell. It needs a cap for the tank. I know that a truck load of these heaters were sent to the crushers about 14 years ago. I have never seen another one. David Floyd
Hi there! I’m not interested in buying your heater, because I no longer have either of my shop vans. I am curious about it, though. You mentioned a cap for the tank, but the heaters that I’m familiar with drew their fuel directly from the vehicle’s main fuel tank. I wonder if you have a different type of heater than the ones that were in my shop vans? Feel free to email me some pictures of it if you would like to.
As far as selling it, I’d recommend either posting a classified ad on the Steel Soldiers forum, or listing it on eBay.
if you still have the heater i am interested
ive a m109a3 i drove off the national guard base to home currently haveing an issue with getting an oring for fuel filter any ideals if you ready for another one lowest i can go is $5500 looking at getting a wrecker instead
I’d try asking a vendor like Memphis Equipment about the filter O-ring. Good luck!
just ordered a set thanks
i have one of this … i can see someone has punched the chassis number there near front left fender.
can u please guide me where can i find the original OEM chassis number.
Are you are asking about that vehicle’s serial number? The number stamped on the frame rail behind the left front wheel is the OEM serial number.
So you wasn’t really impressed with the van version? I’m thinking about getting a 1968 model
I liked it just fine, and I still think it was a beautiful truck. I just realized that I don’t really like driving a big manual-tranmission truck with no air conditioning, and properly kitting out the van box as an RV was beyond my level of dedication. Somtimes I wish I still had it… like just now when I opened up this page to reply and saw my old pictures! But this truck was just decaying from neglect while I worked on other projects, so it made sense to let it go. If you like driving old trucks like this and you have the gumption to kit it out the way you like, then go for it!
Just starting my research on Army trucks for possible RV conversion. What did you pay for it? Is the cab noisy? Did you install any kind of air-conditioning? I’ve heard the Army doesn’t have an AC unit. Are they’re units that can be put in these trucks? Thanks! Great article!!!
Hi! I do not remember how much I paid for this truck at auction. It was over 20 years ago in 1999! I sold it in 2004. I did not install any A/C while I had it. The cab is VERY LOUD in these trucks… loud enough that occupants should wear hearing protection.